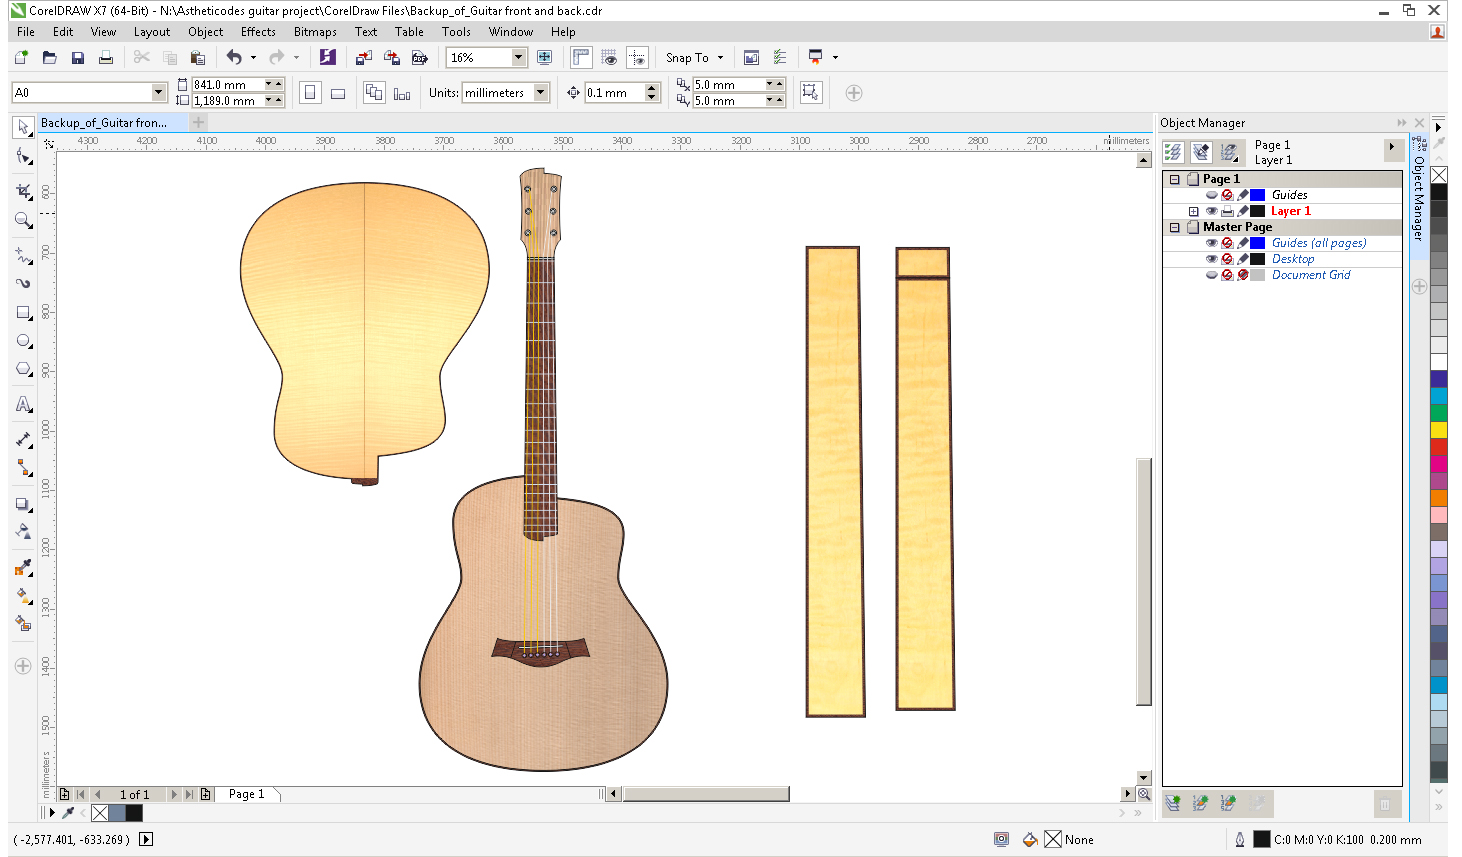
Guitar build
This section lists the key specifications of the guitar itself.
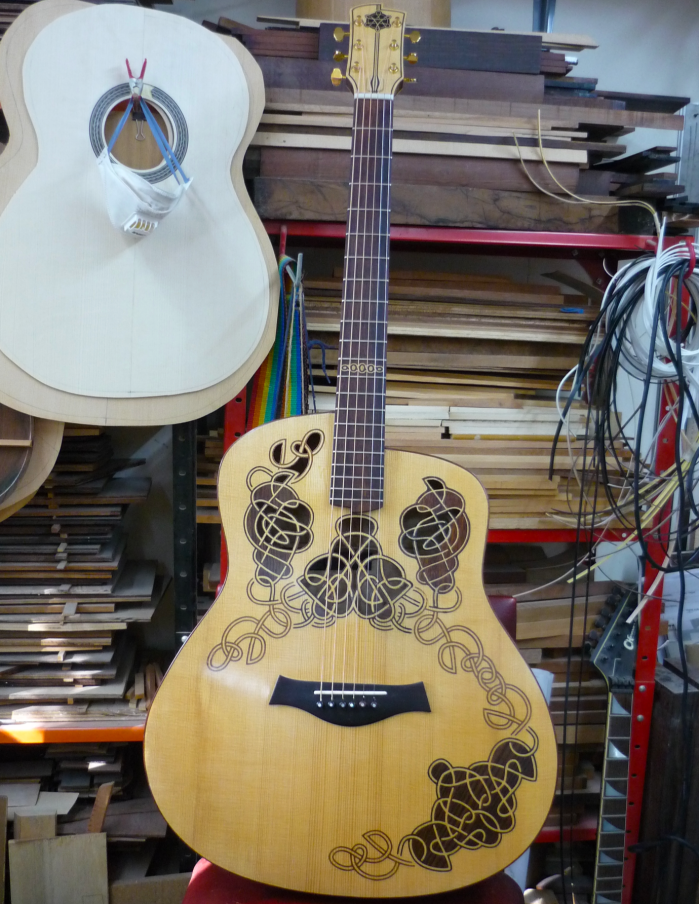
Woods
Soundboard:
- Spruce (2 piece)
- Indian Rosewood and Mahogany inlay
- bracings: Spruce – double X-Bracing (additional X-Bracing in lower bout)
Back:
- Bookmatched flamed Maple
- Indian Rosewood inlay
- bracings: Spruce – Ladder pattern
Sides:
- Bookmatched flamed Maple
- Stained Sycamore inlay in top side soundhole
Bridge:
- Blackwood
Bindings:
- Reclaimed Mahogany
Neck:
- Reclaimed Mahogany
- Mother of pearl inlay dots on top binding at 3rd, 5th, 7th, 10th and 12th frets (note the Gypsy Jazz style of marking the 10th rather than the 9th fret).
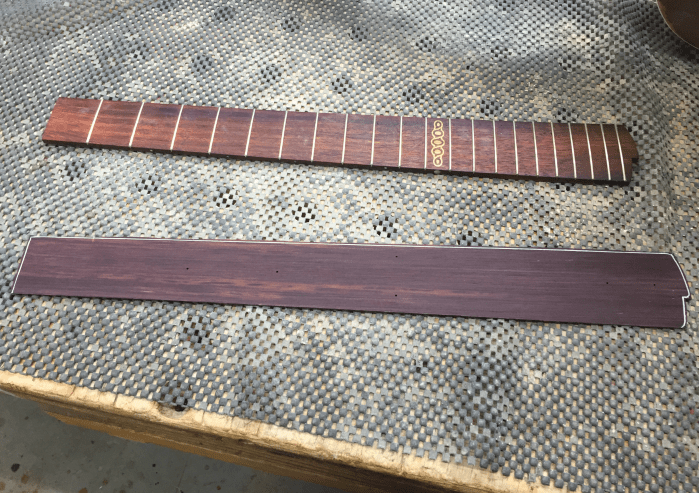
Fingerboard:
- Indian Rosewood
- Maple inlay for 12th fret code
Headstock:
- Mahogany
- Flamed Maple veneer front and back
- Ebony dust and resin inlay on headstock code
Nut:
- Bone
Shape and dimensions
Body:
- Based on a Dreadnought with cutaway = 510mmm x 425mm
- Depth 102mm at bottom – 86mm at neck
Headstock:
- 152mmm x 70mm x 17mm
Neck:
- 21 frets with a 25.5″ (610mm) Scale length
- Width: 45mm at Nut – 54mm at Heel
- Asymetric D-Shaped contour
Hardware
Tuners:
- Schaller Superior Machine Head, GrandTune (Brass)
Pick-up:
- Fishman Matrix pick-up.
- (was previous a B-Band 29R Under Saddle Transducer (UST) for wide saddle slots but this was replaced by the Fishman in 2019 following its failure)
Pre-amp:
- B-Band A1.2 with volume Control
Strings:
- First set on delivery: Newtone Masterclass 12-54 (locally made in Derbyshire
- Usual: D’Addario EJ26 11-52
Case:
- Hiscox Pro II in Cream.
Software
This section lists the key specifications of the software that is used to interact with the guitar.
Recognition app
‘Aestheticodes’ app available from iTunes and Google Play
Aestheticode mappings
Where the various aestheticodes are located on the guitar:
Code Location on the guitar
1:1:1:1:2 Headstock logo (inlay)
1:1:3:3:4 Soundboard repeated three times on the upper and lower bouts (inlay and sound hole)
1:1:2:4:4 Soundboard under the strings (inlay and sound hole)
1:1:1:4:5 Back of the guitar (inlay)
1:1:2:3:5 Removable soundhole in the top side (Iinlay and sound hole)
1:1:5:6:6 In the cutaway ‘nook’ underneath where the neck joins the body (inlay)
1:1:1:1:1 Fret marker ay the 12th fret (inlay)
Aestheticode config file
The mapping of these various aesthetocdes to the specific actions carried out by the app when they are scanned is specified in the Aesthticodes configuration file. The following is the current version of the Carolan configuration file that was updated on November 1st 2014:
{
“markers”: [
{
“code”: “1:1:1:1:2”,
“action”: “http://www.carolanguitar.com/about”,
“editable”: true
},
{
“code”: “1:1:3:3:4”,
“action”: “http://wp.me/P4QC5t-9g”,
“editable”: true
},
{
“code”: “1:1:1:4:5”,
“action”: “http://wp.me/P4QC5t-6A”,
“editable”: true
},
{
“code”: “1:1:2:3:5”,
“action”: “http://wp.me/P4QC5t-3Q”,
“editable”: true
},
{
“code”: “1:1:2:4:4”,
“action”: “http://wp.me/P4QC5t-3T”,
“editable”: true
},
{
“code”: “1:1:5:5:6”,
“action”: “http://www.youtube.com/playlist?list=PLPvnQgbeSXV6fRryEuIZRdlIutXdMDgd6”,
“editable”: true
}
{
“code”: “1:1:1:1:1”,
“action”: “https://www.youtube.com/watch?v=kW39Mt5kscQ”,
“editable”: true
}
],
“id”: “uk.ac.horizon.aestheticodes.carolan”,
“name”: “Carolan”,
“icon”: “http://www.wornchaos.org/experiences/uk.ac.horizon.aestheticodes.carolan.png”,
“minRegions”: 5,
“maxRegions”: 5,
“maxEmptyRegions”: 0,
“maxRegionValue”: 6,
“validationRegions”: 2,
“validationRegionValue”: 1,
“checksumModulo”: 6,
“markerOccurrence”: 1,
“modes”: [“detect”, “outline”, “threshold”],
“editable”: false,
“addMarkers”: false
}
Maintenance
The following provide information about how to maintain the guitar.
Accessing the inside (including the battery pack for the pickup)
Remove the top sound hole (held in by magnets).
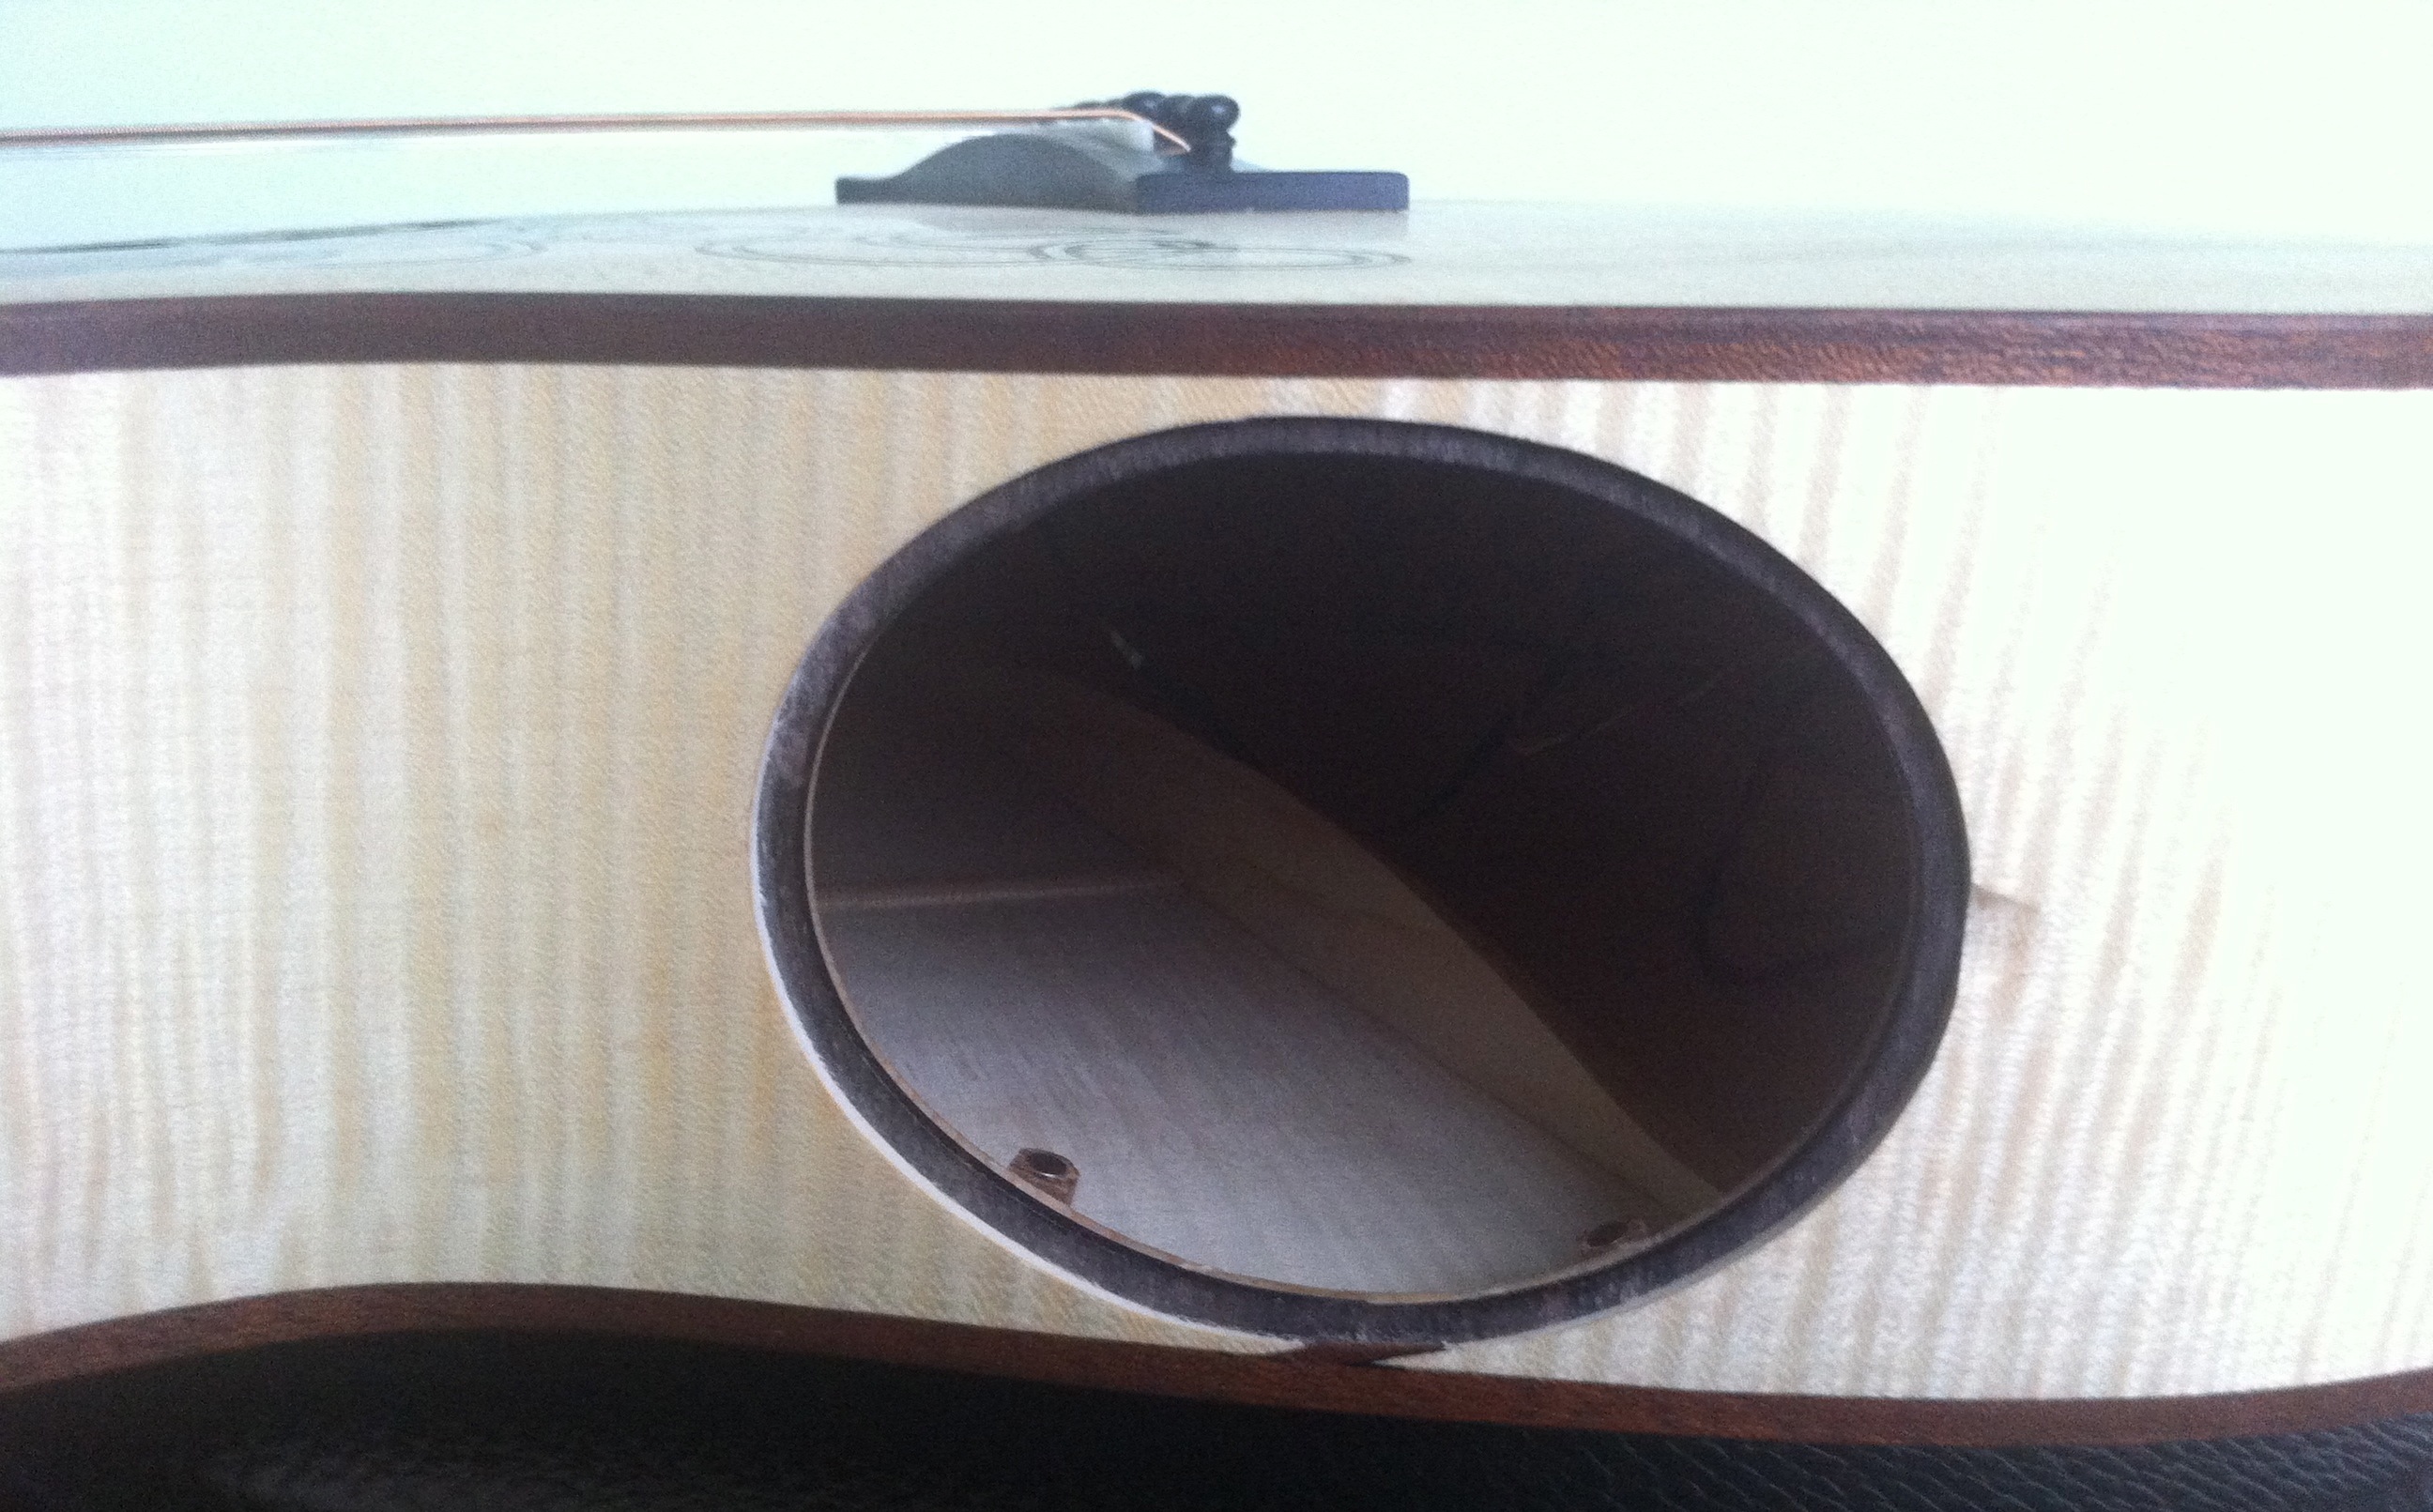
Looking into the top sound hole. Volume control and battery just under to top on the right.
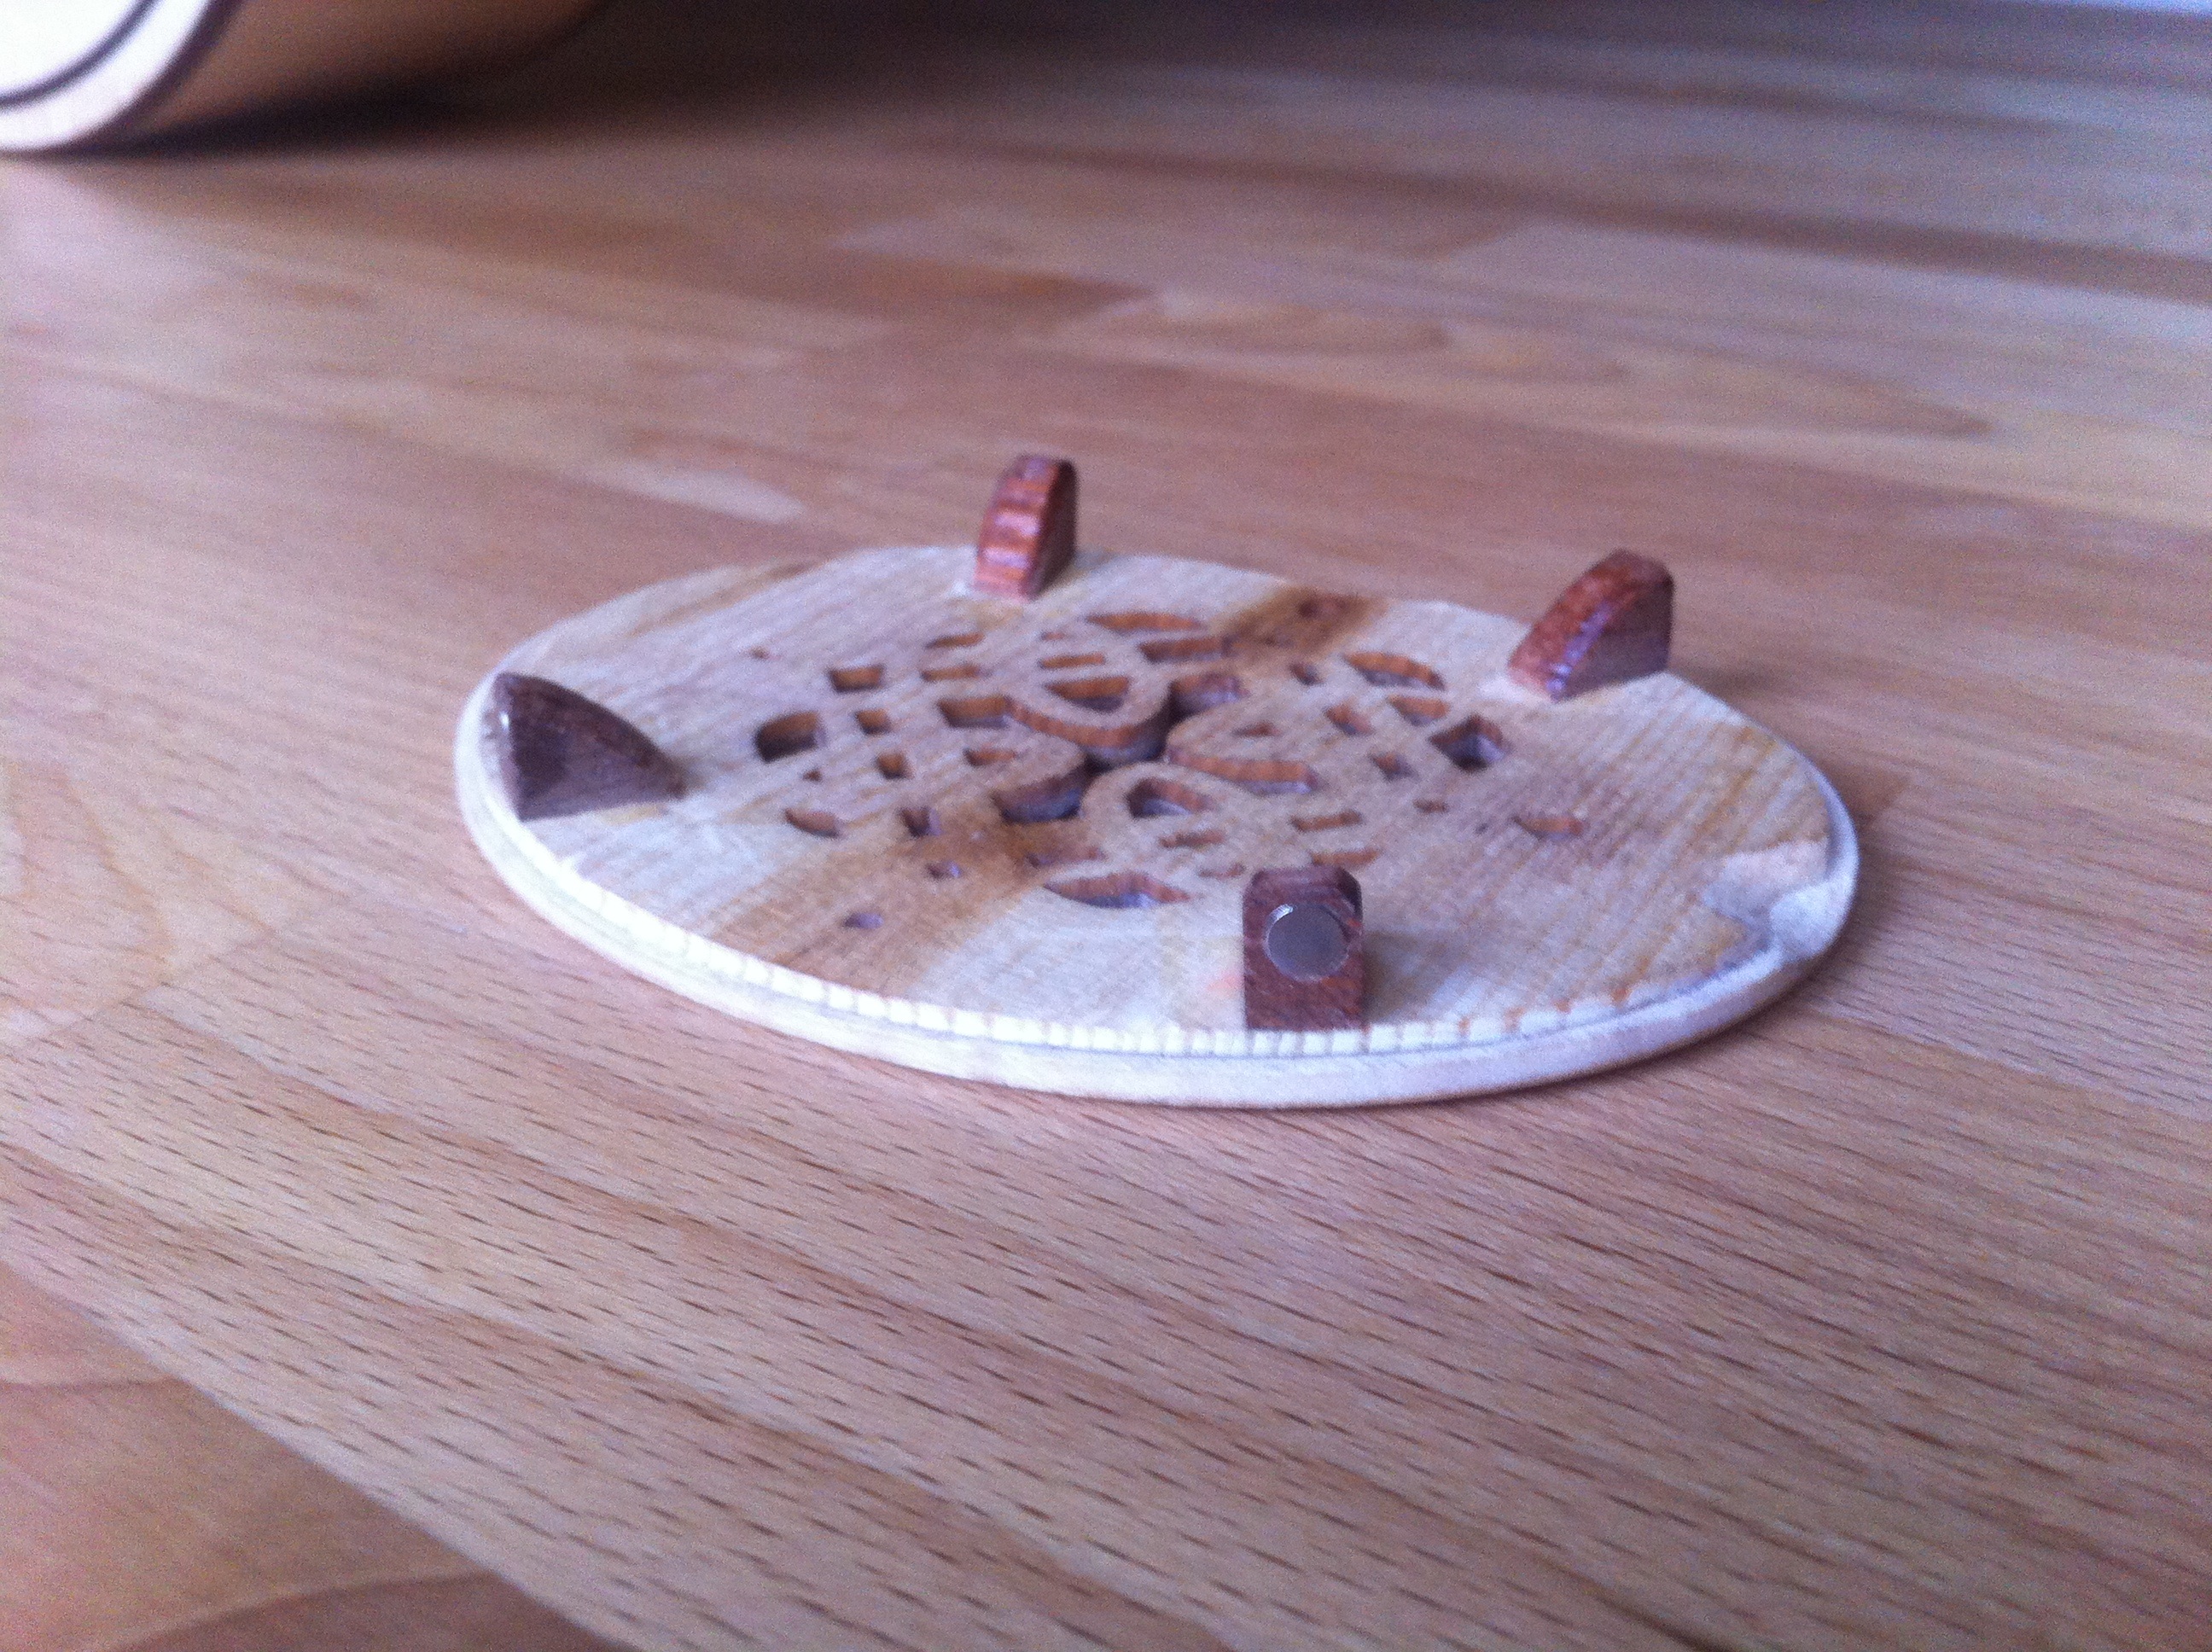
Upside-down Showing Magnets
The battery pack is located in a fabric holder that is velcroed just inside this sound hold towards the lower bout of the guitar.
Accessing the truss rod
Lift off the wooden truss rod cover on the front of the headstock.
Software configuration
To change the software configuration contact either Kevin Glover (who manages the Aestheticodes software), Steve benford or Adrian Hazzard by email at first name.lastname@nottingham.ac.uk. You can edit the config file and send them a new version or request them to make specific edits.
History of build and maintenance log
The following is the history of maintenance.
Video of etching the soundboard
Video of etching the back
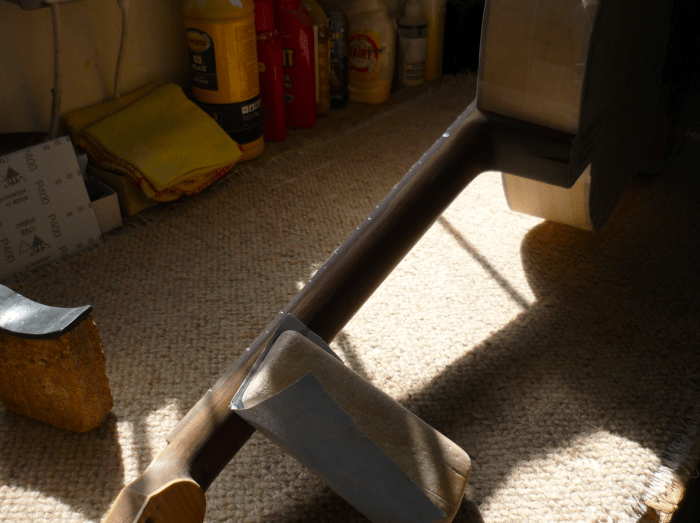
Adrian Lucas – Lowering the action – 2014
Adrian Lucas of the Newark Guitar Workshop lowered the actions and straightened the alignment of the strings. This involved thinning out the bridge and also plugging and subsequently redrilling the holes for the bridge pins. Work completed 15th October 2014.
Colin Keefe – Neck Shim 2019
Luthier Colin Keefe further reduced Carolan action. Date of work 32st Augutst 2019.
Carolan’s fingerboard was removed. This revealed that the headstock and veneer were both lifting …

The fingerboard was glued securely at the body end, so heat was applied …

… and a palette knife used to loosen it …
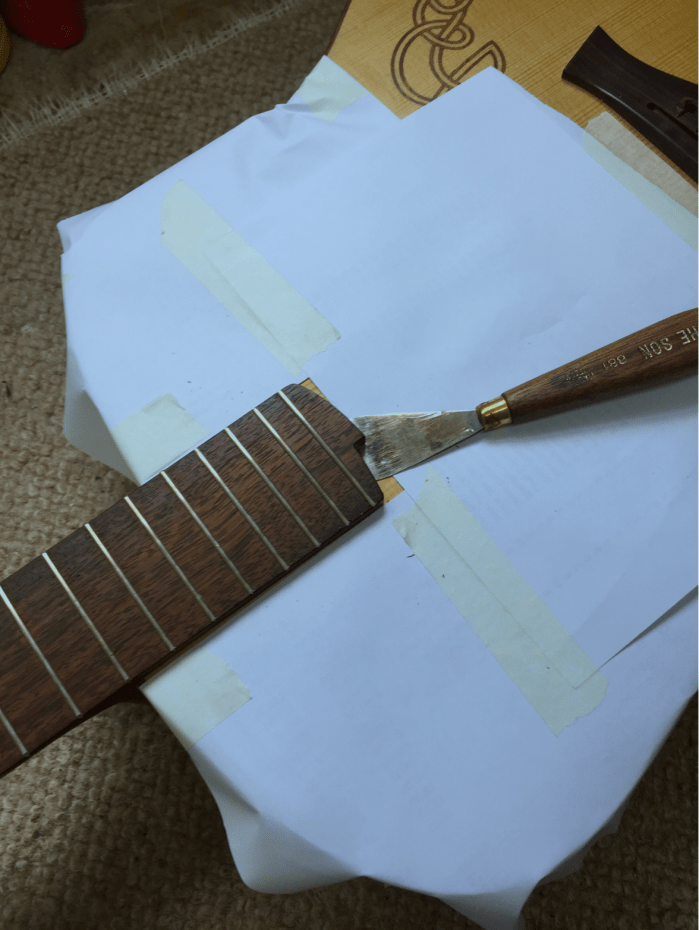
The fingerboard was then removed …

Since the veneer was lifting, it was removed, cleaned up and re-glued …


A rosewood veneer shim was glued to the underside of the fingerboard and tapered down to nut end.

This raises the angle of the fingerboard in relation to the body so that a line extending out from the fingerboard (including the frets) will clear the bridge with room to fit a normal height saddle. It’s difficult to get a clear photo of the tapered shim, but it is basically like this …
![]()
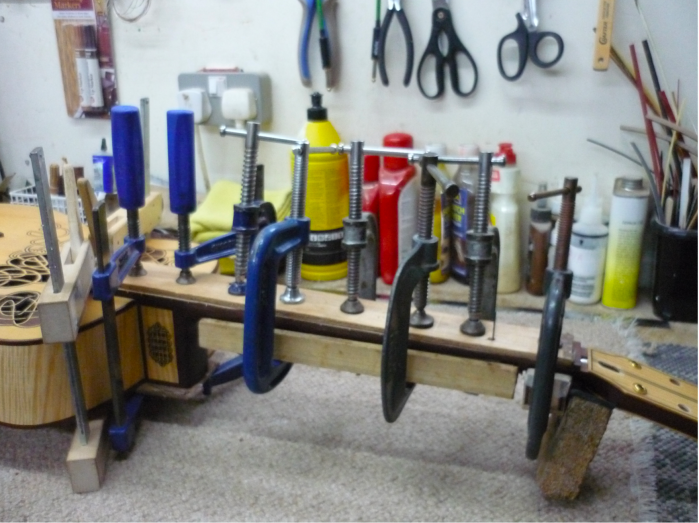
The neck was then sanded flat to remove any old glue and the shimmed fingerboard was glued back.

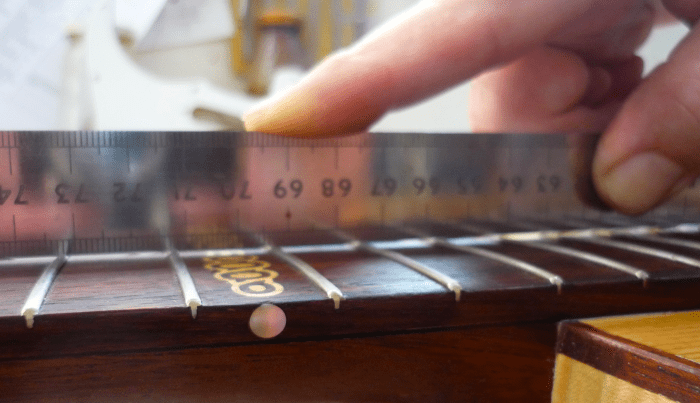
Once glued, a long ruler was laid along the frets to measure where the angle of the fingerboard meets the bridge. This was found to be very slightly lower than the bridge, so the bridge was planed down until a ruler laid from the bridge along the fingerboard was flat to the frets. At this point the frets were also stoned level and re-crowned.
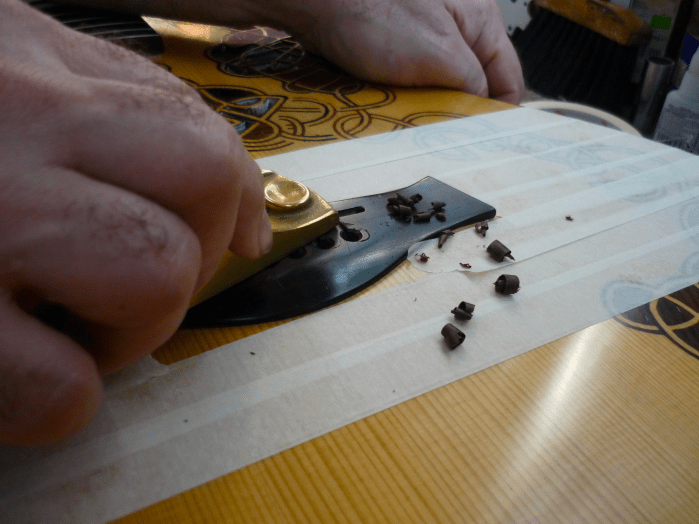
 It is impossible to do this type of repair without some minor damage to the finish, particularly around where things have been re-glued. Therefore the back, sides, fingerboard and bridge were masked off, the existing finish to the neck and top of the guitar flattened off with 400 grit paper and finishing coats of lacquer sprayed, flattening off between each coat.

The original saddle was broken so a new one was made from bone. The truss rod was adjusted to give the correct amount of neck relief and the new saddle cut to give an acceptable playing action. The new saddle was slightly shorter than would be ideal but the depth of the saddle slot could not be easily be increased to allow a taller and therefore stronger one to be fitted due to the way that the slot had been originally routed (wider at one end). A thin reinforcing maple shim was therefore glued to the bottom of the new saddle for added strength.
Finally, the string slots at the nut were re-cut.

The action (string height above frets) after the repair is now at 2.5mm at the 12th fret on the bass side and just under 2mm on the treble, which is around half of what it was before the repair – the guitar is now playable again.

If over time the top continues to pull up under string tension the action will increase. If it becomes unplayable again the next course of action could be to make a new, thinner bridge.
Colin also removed the old B-band pick-up and supplied and fitted a new Fishman Matrix pick-up. This included routing the saddle slot to suit and making new saddle in water buffalo horn followed by a set-up.
